GPU and batched data augmentation with Kornia and PyTorch-Lightning
Author: PL/Kornia team
License: CC BY-SA
Generated: 2022-04-28T08:05:25.441208
In this tutorial we will show how to combine both Kornia.org and PyTorch Lightning to perform efficient data augmentation to train a simpple model using the GPU in batch mode without additional effort.
Open in 
Give us a ⭐ on Github | Check out the documentation | Join us on Slack
Setup
This notebook requires some packages besides pytorch-lightning.
[1]:
! pip install --quiet "torchvision" "pytorch-lightning>=1.4" "torchmetrics>=0.6" "pandas" "matplotlib" "torch>=1.6, <1.9" "torchmetrics" "kornia" "seaborn" "ipython[notebook]"
  WARNING: The scripts convert-caffe2-to-onnx and convert-onnx-to-caffe2 are installed in '/home/AzDevOps_azpcontainer/.local/bin' which is not on PATH.
  Consider adding this directory to PATH or, if you prefer to suppress this warning, use --no-warn-script-location.
WARNING: You are using pip version 21.3.1; however, version 22.0.4 is available.
You should consider upgrading via the '/usr/bin/python3.8 -m pip install --upgrade pip' command.
[2]:
import os

import matplotlib.pyplot as plt
import numpy as np
import pandas as pd
import seaborn as sn
import torch
import torch.nn as nn
import torchmetrics
import torchvision
from IPython.core.display import display
from kornia import image_to_tensor, tensor_to_image
from kornia.augmentation import ColorJitter, RandomChannelShuffle, RandomHorizontalFlip, RandomThinPlateSpline
from pytorch_lightning import LightningModule, Trainer
from pytorch_lightning.callbacks.progress import TQDMProgressBar
from pytorch_lightning.loggers import CSVLogger
from torch import Tensor
from torch.nn import functional as F
from torch.utils.data import DataLoader
from torchvision.datasets import CIFAR10

sn.set()
Define Data Augmentations module
Kornia.org is low level Computer Vision library that provides a dedicated module `kornia.augmentation <https://kornia.readthedocs.io/en/latest/augmentation.html>`__ module implementing en extensive set of data augmentation techniques for image and video.
Similar to Lightning, in Kornia it’s promoted to encapsulate functionalities inside classes for readability and efficiency purposes. In this case, we define a data augmentaton pipeline subclassing a nn.Module where the augmentation_kornia (also subclassing nn.Module) are combined with other PyTorch components such as nn.Sequential.
Checkout the different augmentation operators in Kornia docs and experiment yourself !
[3]:
class DataAugmentation(nn.Module):
    """Module to perform data augmentation using Kornia on torch tensors."""

    def __init__(self, apply_color_jitter: bool = False) -> None:
        super().__init__()
        self._apply_color_jitter = apply_color_jitter

        self.transforms = nn.Sequential(
            RandomHorizontalFlip(p=0.75),
            RandomChannelShuffle(p=0.75),
            RandomThinPlateSpline(p=0.75),
        )

        self.jitter = ColorJitter(0.5, 0.5, 0.5, 0.5)

    @torch.no_grad()  # disable gradients for effiency
    def forward(self, x: Tensor) -> Tensor:
        x_out = self.transforms(x)  # BxCxHxW
        if self._apply_color_jitter:
            x_out = self.jitter(x_out)
        return x_out
Define a Pre-processing module
In addition to the DataAugmentation modudle that will sample random parameters during the training stage, we define a Preprocess class to handle the conversion of the image type to properly work with Tensor.
For this example we use torchvision CIFAR10 which return samples of PIL.Image, however, to take all the advantages of PyTorch and Kornia we need to cast the images into tensors.
To do that we will use kornia.image_to_tensor which casts and permutes the images in the right format.
[4]:
class Preprocess(nn.Module):
    """Module to perform pre-process using Kornia on torch tensors."""

    @torch.no_grad()  # disable gradients for effiency
    def forward(self, x) -> Tensor:
        x_tmp: np.ndarray = np.array(x)  # HxWxC
        x_out: Tensor = image_to_tensor(x_tmp, keepdim=True)  # CxHxW
        return x_out.float() / 255.0
Define PyTorch Lightning model
The next step is to define our LightningModule to have a proper organisation of our training pipeline. This is a simple example just to show how to structure your baseline to be used as a reference, do not expect a high performance.
Notice that the Preprocess class is injected into the dataset and will be applied per sample.
The interesting part in the proposed approach happens inside the training_step where with just a single line of code we apply the data augmentation in batch and no need to worry about the device. This means that our DataAugmentation pipeline will automatically executed in the GPU.
[5]:
class CoolSystem(LightningModule):
def __init__(self):
super().__init__()
# not the best model: expereiment yourself
self.model = torchvision.models.resnet18(pretrained=True)
self.preprocess = Preprocess() # per sample transforms
self.transform = DataAugmentation() # per batch augmentation_kornia
self.train_accuracy = torchmetrics.Accuracy()
self.val_accuracy = torchmetrics.Accuracy()
def forward(self, x):
return self.model(x)
def compute_loss(self, y_hat, y):
return F.cross_entropy(y_hat, y)
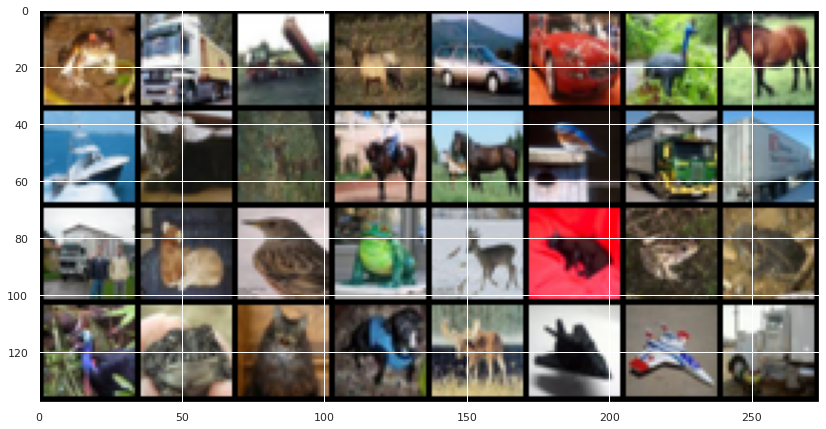
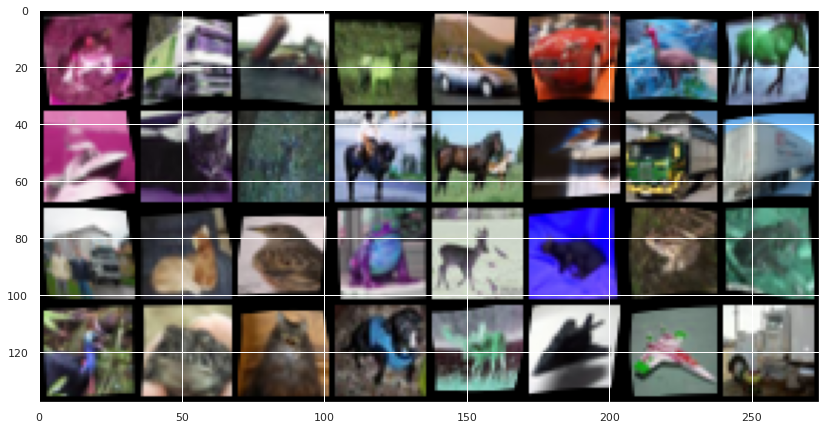
def show_batch(self, win_size=(10, 10)):
def _to_vis(data):
return tensor_to_image(torchvision.utils.make_grid(data, nrow=8))
# get a batch from the training set: try with `val_datlaoader` :)
imgs, labels = next(iter(self.train_dataloader()))
imgs_aug = self.transform(imgs) # apply transforms
# use matplotlib to visualize
plt.figure(figsize=win_size)
plt.imshow(_to_vis(imgs))
plt.figure(figsize=win_size)
plt.imshow(_to_vis(imgs_aug))
def on_after_batch_transfer(self, batch, dataloader_idx):
x, y = batch
if self.trainer.training:
x = self.transform(x) # => we perform GPU/Batched data augmentation
return x, y
def training_step(self, batch, batch_idx):
x, y = batch
y_hat = self(x)
loss = self.compute_loss(y_hat, y)
self.train_accuracy.update(y_hat, y)
self.log("train_loss", loss, prog_bar=False)
self.log("train_acc", self.train_accuracy, prog_bar=False)
return loss
def validation_step(self, batch, batch_idx):
x, y = batch
y_hat = self(x)
loss = self.compute_loss(y_hat, y)
self.val_accuracy.update(y_hat, y)
self.log("valid_loss", loss, prog_bar=False)
self.log("valid_acc", self.val_accuracy, prog_bar=True)
def configure_optimizers(self):
optimizer = torch.optim.AdamW(self.model.parameters(), lr=1e-4)
scheduler = torch.optim.lr_scheduler.CosineAnnealingLR(optimizer, self.trainer.max_epochs, 0)
return [optimizer], [scheduler]
def prepare_data(self):
CIFAR10(os.getcwd(), train=True, download=True, transform=self.preprocess)
CIFAR10(os.getcwd(), train=False, download=True, transform=self.preprocess)
def train_dataloader(self):
dataset = CIFAR10(os.getcwd(), train=True, download=True, transform=self.preprocess)
loader = DataLoader(dataset, batch_size=32)
return loader
def val_dataloader(self):
dataset = CIFAR10(os.getcwd(), train=False, download=True, transform=self.preprocess)
loader = DataLoader(dataset, batch_size=32)
return loader
Visualize images
[6]:
# init model
model = CoolSystem()
Downloading: "https://download.pytorch.org/models/resnet18-5c106cde.pth" to /home/AzDevOps_azpcontainer/.cache/torch/hub/checkpoints/resnet18-5c106cde.pth
[7]:
model.show_batch(win_size=(14, 14))
Downloading https://www.cs.toronto.edu/~kriz/cifar-10-python.tar.gz to /__w/1/s/cifar-10-python.tar.gz
Extracting /__w/1/s/cifar-10-python.tar.gz to /__w/1/s
Run training
[8]:
# Initialize a trainer
trainer = Trainer(
    callbacks=[TQDMProgressBar(refresh_rate=20)],
    accelerator="auto",
    devices=1 if torch.cuda.is_available() else None,  # limiting got iPython runs
    max_epochs=10,
    logger=CSVLogger(save_dir="logs/"),
)

# Train the model ⚡
trainer.fit(model)
GPU available: True, used: True
TPU available: False, using: 0 TPU cores
IPU available: False, using: 0 IPUs
HPU available: False, using: 0 HPUs
Files already downloaded and verified
Files already downloaded and verified
Missing logger folder: logs/lightning_logs
LOCAL_RANK: 0 - CUDA_VISIBLE_DEVICES: [0,1]

  | Name           | Type             | Params
----------------------------------------------------
0 | model          | ResNet           | 11.7 M
1 | preprocess     | Preprocess       | 0
2 | transform      | DataAugmentation | 0
3 | train_accuracy | Accuracy         | 0
4 | val_accuracy   | Accuracy         | 0
----------------------------------------------------
11.7 M    Trainable params
0         Non-trainable params
11.7 M    Total params
46.758    Total estimated model params size (MB)
Files already downloaded and verified
/home/AzDevOps_azpcontainer/.local/lib/python3.8/site-packages/pytorch_lightning/trainer/connectors/data_connector.py:240: PossibleUserWarning: The dataloader, val_dataloader 0, does not have many workers which may be a bottleneck. Consider increasing the value of the `num_workers` argument` (try 12 which is the number of cpus on this machine) in the `DataLoader` init to improve performance.
  rank_zero_warn(
Files already downloaded and verified
/home/AzDevOps_azpcontainer/.local/lib/python3.8/site-packages/pytorch_lightning/trainer/connectors/data_connector.py:240: PossibleUserWarning: The dataloader, train_dataloader, does not have many workers which may be a bottleneck. Consider increasing the value of the `num_workers` argument` (try 12 which is the number of cpus on this machine) in the `DataLoader` init to improve performance.
  rank_zero_warn(
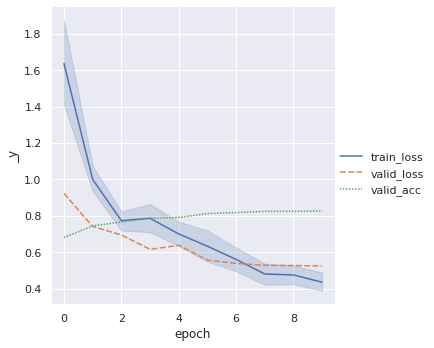
Visualize the training results
[9]:
metrics = pd.read_csv(f"{trainer.logger.log_dir}/metrics.csv")
del metrics["step"]
metrics.set_index("epoch", inplace=True)
display(metrics.dropna(axis=1, how="all").head())
sn.relplot(data=metrics, kind="line")
| train_loss | valid_loss | valid_acc | |
|---|---|---|---|
| epoch | |||
| 0 | 4.482260 | NaN | NaN |
| 0 | 2.776911 | NaN | NaN |
| 0 | 2.466684 | NaN | NaN |
| 0 | 2.532208 | NaN | NaN |
| 0 | 1.774860 | NaN | NaN |
[9]:
<seaborn.axisgrid.FacetGrid at 0x7fd6e75c8d30>
Congratulations - Time to Join the Community!
Congratulations on completing this notebook tutorial! If you enjoyed this and would like to join the Lightning movement, you can do so in the following ways!
Star Lightning on GitHub
The easiest way to help our community is just by starring the GitHub repos! This helps raise awareness of the cool tools we’re building.
Join our Slack!
The best way to keep up to date on the latest advancements is to join our community! Make sure to introduce yourself and share your interests in #general channel
Contributions !
The best way to contribute to our community is to become a code contributor! At any time you can go to Lightning or Bolt GitHub Issues page and filter for “good first issue”.
You can also contribute your own notebooks with useful examples !
Great thanks from the entire Pytorch Lightning Team for your interest !

