Loops
Loops let advanced users swap out the default gradient descent optimization loop at the core of Lightning with a different optimization paradigm.
The Lightning Trainer is built on top of the standard gradient descent optimization loop which works for 90%+ of machine learning use cases:
for i, batch in enumerate(dataloader):
    x, y = batch
    y_hat = model(x)
    loss = loss_function(y_hat, y)
    optimizer.zero_grad()
    loss.backward()
    optimizer.step()
However, some new research use cases such as meta-learning, active learning, recommendation systems, etc., require a different loop structure. For example here is a simple loop that guides the weight updates with a loss from a special validation split:
for i, batch in enumerate(train_dataloader):
    x, y = batch
    y_hat = model(x)
    loss = loss_function(y_hat, y)
    optimizer.zero_grad()
    loss.backward()

    val_loss = 0
    for i, val_batch in enumerate(val_dataloader):
        x, y = val_batch
        y_hat = model(x)
        val_loss += loss_function(y_hat, y)

    scale_gradients(model, 1 / val_loss)
    optimizer.step()
With Lightning Loops, you can customize to non-standard gradient descent optimizations to get the same loop above:
trainer = Trainer()
trainer.fit_loop.epoch_loop = MyGradientDescentLoop()
Think of this as swapping out the engine in a car!
Understanding the Default Trainer Loop
The Lightning Trainer automates the standard optimization loop which every PyTorch user is familiar with:
for i, batch in enumerate(dataloader):
    x, y = batch
    y_hat = model(x)
    loss = loss_function(y_hat, y)
    optimizer.zero_grad()
    loss.backward()
    optimizer.step()
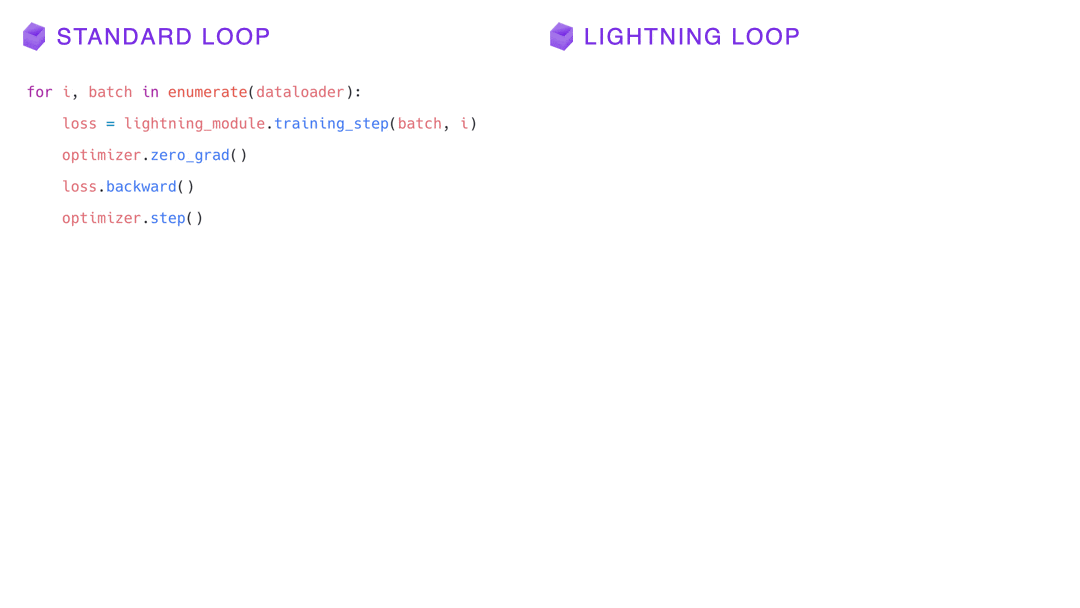
The core research logic is simply shifted to the LightningModule:
for i, batch in enumerate(dataloader):
    # x, y = batch                      moved to training_step
    # y_hat = model(x)                  moved to training_step
    # loss = loss_function(y_hat, y)    moved to training_step
    loss = lightning_module.training_step(batch, i)

    # Lightning handles automatically:
    optimizer.zero_grad()
    loss.backward()
    optimizer.step()
Under the hood, the above loop is implemented using the Loop API like so:
class DefaultLoop(Loop):
    def advance(self, batch, i):
        loss = lightning_module.training_step(batch, i)
        optimizer.zero_grad()
        loss.backward()
        optimizer.step()

    def run(self, dataloader):
        for i, batch in enumerate(dataloader):
            self.advance(batch, i)
Defining a loop within a class interface instead of hard-coding a raw Python for/while loop has several benefits:
You can have full control over the data flow through loops.
You can add new loops and nest as many of them as you want.
If needed, the state of a loop can be saved and resumed.
New hooks can be injected at any point.
Overriding the default Loops
The fastest way to get started with loops, is to override functionality of an existing loop.
Lightning has 4 main loops which relies on : FitLoop for fitting (training and validating),
EvaluationLoop for validating or testing,
PredictionLoop for predicting.
For simple changes that don’t require a custom loop, you can modify each of these loops.
Each loop has a series of methods that can be modified.
For example with the FitLoop:
from pytorch_lightning.loops import FitLoop


class MyLoop(FitLoop):
    def advance(self):
        """Advance from one iteration to the next."""

    def on_advance_end(self):
        """Do something at the end of an iteration."""

    def on_run_end(self):
        """Do something when the loop ends."""
A full list with all built-in loops and subloops can be found here.
To add your own modifications to a loop, simply subclass an existing loop class and override what you need. Here is a simple example how to add a new hook:
from pytorch_lightning.loops import FitLoop


class CustomFitLoop(FitLoop):
    def advance(self):
        # ... whatever code before

        # pass anything you want to the hook
        self.trainer.call_hook("my_new_hook", *args, **kwargs)

        # ... whatever code after
Now simply attach the correct loop in the trainer directly:
trainer = Trainer(...)
trainer.fit_loop = CustomFitLoop()

# fit() now uses the new FitLoop!
trainer.fit(...)

# the equivalent for validate()
val_loop = CustomValLoop()
trainer = Trainer()
trainer.validate_loop = val_loop
trainer.validate(...)
Now your code is FULLY flexible and you can still leverage ALL the best parts of Lightning!

Creating a New Loop From Scratch
You can also go wild and implement a full loop from scratch by sub-classing the Loop base class.
You will need to override a minimum of two things:
from pytorch_lightning.loop import Loop


class MyFancyLoop(Loop):
    @property
    def done(self):
        """Provide a condition to stop the loop."""

    def advance(self):
        """
        Access your dataloader/s in whatever way you want.
        Do your fancy optimization things.
        Call the LightningModule methods at your leisure.
        """
Finally, attach it into the Trainer:
trainer = Trainer(...)
trainer.fit_loop = MyFancyLoop()

# fit() now uses your fancy loop!
trainer.fit(...)
But beware: Loop customization gives you more power and full control over the Trainer and with great power comes great responsibility. We recommend that you familiarize yourself with overriding the default loops first before you start building a new loop from the ground up.
Loop API
Here is the full API of methods available in the Loop base class.
The Loop class is the base of all loops in the same way as the LightningModule is the base of all models.
It defines a public interface that each loop implementation must follow, the key ones are:
Properties
done
- Loop.done
Property indicating when the loop is finished.
Example:
@property
def done(self):
    return self.trainer.global_step >= self.trainer.max_steps
- Return type
skip (optional)
Methods
reset (optional)
advance
run (optional)
- Loop.run(*args, **kwargs)[source]
The main entry point to the loop.
Will frequently check the
donecondition and callsadvanceuntildoneevaluates toTrue.Override this if you wish to change the default behavior. The default implementation is:
Example:
def run(self, *args, **kwargs):
    if self.skip:
        return self.on_skip()

    self.reset()
    self.on_run_start(*args, **kwargs)

    while not self.done:
        self.advance(*args, **kwargs)

    output = self.on_run_end()
    return output
- Return type
~T
- Returns
The output of
on_run_end(often outputs collected from each step of the loop)
Subloops
When you want to customize nested loops within loops, use the replace() method:
# This takes care of properly instantiating the new Loop and setting all references
trainer.fit_loop.replace(epoch_loop=MyEpochLoop)
# Trainer runs the fit loop with your new epoch loop!
trainer.fit(model)
Alternatively, for more fine-grained control, use the connect() method:
# Optional: stitch back the trainer arguments
epoch_loop = MyEpochLoop(trainer.fit_loop.epoch_loop.min_steps, trainer.fit_loop.epoch_loop.max_steps)
# Optional: connect children loops as they might have existing state
epoch_loop.connect(trainer.fit_loop.epoch_loop.batch_loop, trainer.fit_loop.epoch_loop.val_loop)
# Instantiate and connect the loop.
trainer.fit_loop.connect(epoch_loop=epoch_loop)
trainer.fit(model)
More about the built-in loops and how they are composed is explained in the next section.

Built-in Loops
The training loop in Lightning is called fit loop and is actually a combination of several loops. Here is what the structure would look like in plain Python:
# FitLoop
for epoch in range(max_epochs):

    # TrainingEpochLoop
    for batch_idx, batch in enumerate(train_dataloader):

        # TrainingBatchLoop
        for split_batch in tbptt_split(batch):

            # OptimizerLoop
            for optimizer_idx, opt in enumerate(optimizers):

                loss = lightning_module.training_step(batch, batch_idx, optimizer_idx)
                ...

        # ValidationEpochLoop
        for batch_idx, batch in enumerate(val_dataloader):
            lightning_module.validation_step(batch, batch_idx, optimizer_idx)
            ...
Each of these for-loops represents a class implementing the Loop interface.
Built-in loop |
Description |
|---|---|
The |
|
The In the |
|
The responsibility of the |
|
The |
|
Substitutes the |
|
The |
|
The |
Available Loops in Lightning Flash
Active Learning is a machine learning practice in which the user interacts with the learner in order to provide new labels when required.
You can find a real use case in Lightning Flash.
Flash implements the ActiveLearningLoop that you can use together with the ActiveLearningDataModule to label new data on the fly.
To run the following demo, install Flash and BaaL first:
pip install lightning-flash baal
import torch

import flash
from flash.core.classification import Probabilities
from flash.core.data.utils import download_data
from flash.image import ImageClassificationData, ImageClassifier
from flash.image.classification.integrations.baal import ActiveLearningDataModule, ActiveLearningLoop

# 1. Create the DataModule
download_data("https://pl-flash-data.s3.amazonaws.com/hymenoptera_data.zip", "./data")

# Implement the research use-case where we mask labels from labelled dataset.
datamodule = ActiveLearningDataModule(
    ImageClassificationData.from_folders(train_folder="data/hymenoptera_data/train/", batch_size=2),
    initial_num_labels=5,
    val_split=0.1,
)

# 2. Build the task
head = torch.nn.Sequential(
    torch.nn.Dropout(p=0.1),
    torch.nn.Linear(512, datamodule.num_classes),
)
model = ImageClassifier(backbone="resnet18", head=head, num_classes=datamodule.num_classes, output=Probabilities())


# 3.1 Create the trainer
trainer = flash.Trainer(max_epochs=3)

# 3.2 Create the active learning loop and connect it to the trainer
active_learning_loop = ActiveLearningLoop(label_epoch_frequency=1)
active_learning_loop.connect(trainer.fit_loop)
trainer.fit_loop = active_learning_loop

# 3.3 Finetune
trainer.finetune(model, datamodule=datamodule, strategy="freeze")

# 4. Predict what's on a few images! ants or bees?
predictions = model.predict("data/hymenoptera_data/val/bees/65038344_52a45d090d.jpg")
print(predictions)

# 5. Save the model!
trainer.save_checkpoint("image_classification_model.pt")
Here is the Active Learning Loop example and the code for the active learning loop.
Advanced Examples
Link to Example |
Description |
|---|---|
KFold / Cross Validation is a machine learning practice in which the training dataset is being partitioned into |
|
This loop enables you to write the |
Advanced Features
Next: Advanced loop features
