Lightning in 2 Steps
In this guide we’ll show you how to organize your PyTorch code into Lightning in 2 steps.
Organizing your code with PyTorch Lightning makes your code:
Keep all the flexibility (this is all pure PyTorch), but removes a ton of boilerplate
More readable by decoupling the research code from the engineering
Easier to reproduce
Less error-prone by automating most of the training loop and tricky engineering
Scalable to any hardware without changing your model
Here’s a 3 minute conversion guide for PyTorch projects:
Step 0: Install PyTorch Lightning
You can install using pip
pip install pytorch-lightning
Or with conda (see how to install conda here):
conda install pytorch-lightning -c conda-forge
You could also use conda environments
conda activate my_env
pip install pytorch-lightning
Import the following:
import os
import torch
from torch import nn
import torch.nn.functional as F
from torchvision import transforms
from torchvision.datasets import MNIST
from torch.utils.data import DataLoader, random_split
import pytorch_lightning as pl
Step 1: Define LightningModule
class LitAutoEncoder(pl.LightningModule):
    def __init__(self):
        super().__init__()
        self.encoder = nn.Sequential(nn.Linear(28 * 28, 64), nn.ReLU(), nn.Linear(64, 3))
        self.decoder = nn.Sequential(nn.Linear(3, 64), nn.ReLU(), nn.Linear(64, 28 * 28))

    def forward(self, x):
        # in lightning, forward defines the prediction/inference actions
        embedding = self.encoder(x)
        return embedding

    def training_step(self, batch, batch_idx):
        # training_step defined the train loop.
        # It is independent of forward
        x, y = batch
        x = x.view(x.size(0), -1)
        z = self.encoder(x)
        x_hat = self.decoder(z)
        loss = F.mse_loss(x_hat, x)
        # Logging to TensorBoard by default
        self.log("train_loss", loss)
        return loss

    def configure_optimizers(self):
        optimizer = torch.optim.Adam(self.parameters(), lr=1e-3)
        return optimizer
SYSTEM VS MODEL
A lightning module defines a system not just a model.
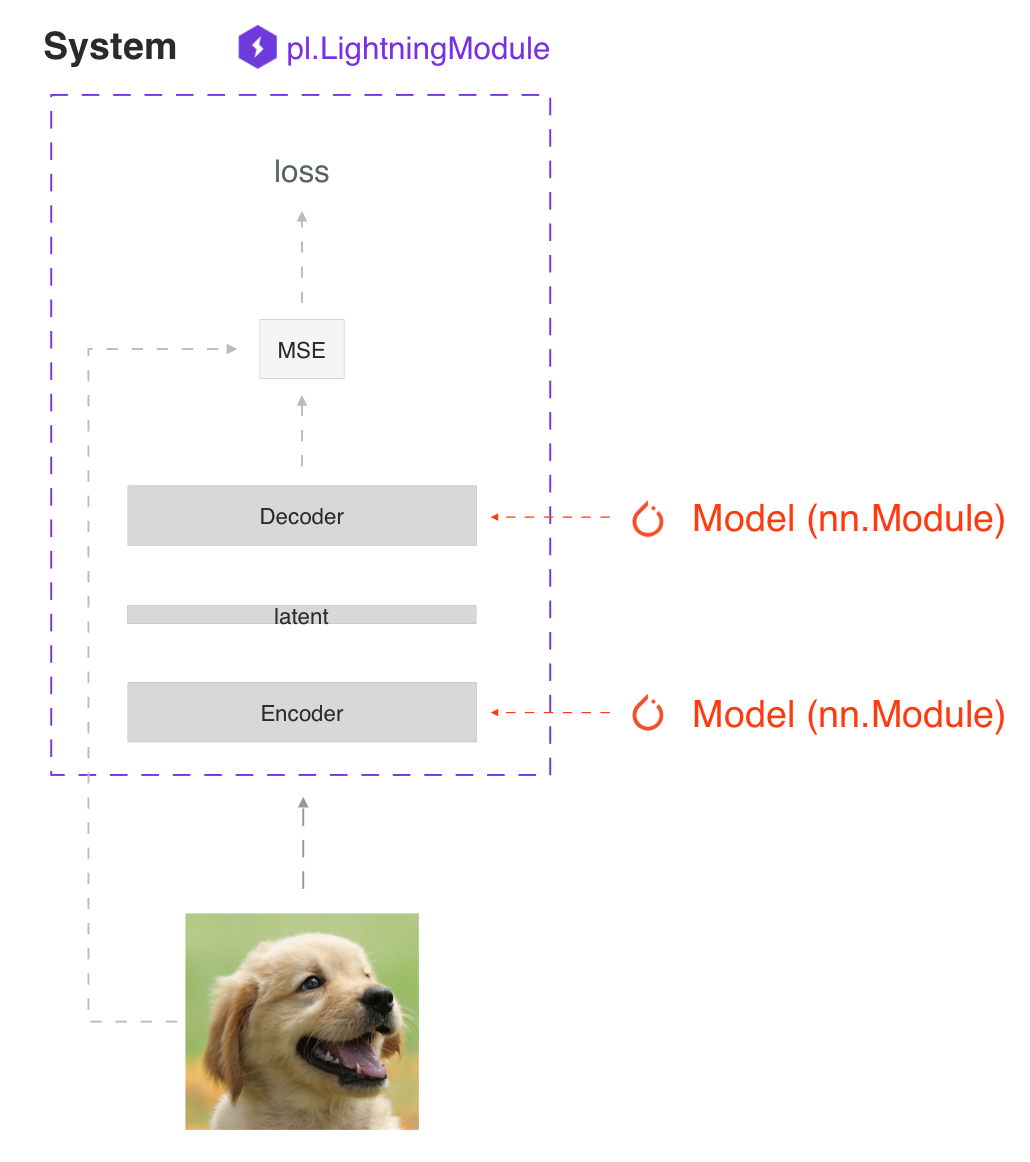
Examples of systems are:
Under the hood, a LightningModule is still just a torch.nn.Module that groups all research code into a single file to make it self-contained:
The Train loop
The Validation loop
The Test loop
The Prediction loop
The Model or system of Models
The Optimizers and LR Schedulers
You can customize any part of training (such as the backward pass) by overriding any of the 20+ hooks found in Hooks
class LitAutoEncoder(pl.LightningModule):
    def backward(self, loss, optimizer, optimizer_idx):
        loss.backward()
FORWARD vs TRAINING_STEP
In Lightning we suggest separating training from inference. The training_step defines
the full training loop. We encourage users to use the forward to define inference actions.
For example, in this case we can define the autoencoder to act as an embedding extractor:
def forward(self, batch):
    embeddings = self.encoder(batch)
    return embeddings
Of course, nothing is preventing you from using forward from within the training_step.
def training_step(self, batch, batch_idx):
    ...
    embeddings = self.encoder(batch)
    output = self.decoder(embeddings)
It really comes down to your application. We do, however, recommend that you keep both intents separate.
Use
forwardfor inference (predicting).Use
training_stepfor training.
More details in LightningModule docs.
Step 2: Fit with Lightning Trainer
First, define the data however you want. Lightning just needs a DataLoader for the train/val/test/predict splits.
dataset = MNIST(os.getcwd(), download=True, transform=transforms.ToTensor())
train_loader = DataLoader(dataset)
Next, init the LightningModule and the PyTorch Lightning Trainer, then call fit with both the data and model.
# init model
autoencoder = LitAutoEncoder()

# most basic trainer, uses good defaults (auto-tensorboard, checkpoints, logs, and more)
# trainer = pl.Trainer(accelerator="gpu", devices=8) (if you have GPUs)
trainer = pl.Trainer()
trainer.fit(model=autoencoder, train_dataloaders=train_loader)
The Trainer automates:
Epoch and batch iteration
optimizer.step(),loss.backward(),optimizer.zero_grad()callsCalling of
model.eval(), enabling/disabling grads during evaluationTensorboard (see loggers options)
Multi-GPU support
16-bit precision AMP support
Tip
If you prefer to manually manage optimizers, you can use the Manual Optimization mode (i.e., RL, GANs, and so on).
That’s it!
These are the main two components you need to know in Lightning in general. All the other features of Lightning are either features of the Trainer or LightningModule or are extensions for advanced use-cases.
Basic Features
Manual vs Automatic Optimization
Automatic Optimization
With Lightning, you don’t need to worry about when to enable/disable grads, do a backward pass, or update optimizers
as long as you return a loss with an attached graph from the training_step() method,
Lightning will automate the optimization.
def training_step(self, batch, batch_idx):
    loss = self.encoder(batch)
    return loss
Manual Optimization
For certain research like GANs, reinforcement learning, or something with multiple optimizers or an inner loop, you can turn off automatic optimization and fully control it yourself.
Turn off automatic optimization, and you control the optimization!
def __init__(self):
    self.automatic_optimization = False


def training_step(self, batch, batch_idx):
    # access your optimizers with use_pl_optimizer=False. Default is True,
    # setting use_pl_optimizer=True will maintain plugin/precision support
    opt_a, opt_b = self.optimizers(use_pl_optimizer=True)

    loss_a = self.generator(batch)
    opt_a.zero_grad()
    # use `manual_backward()` instead of `loss.backward` to automate half precision, etc...
    self.manual_backward(loss_a)
    opt_a.step()

    loss_b = self.discriminator(batch)
    opt_b.zero_grad()
    self.manual_backward(loss_b)
    opt_b.step()
Loop Customization
If you need even more flexibility, you can fully customize the training loop to its core. These are usually required to be customized for advanced use-cases. Learn more inside Loops docs.
Predict or Deploy
When you’re done training, you have three options to use your LightningModule for predictions.
Option 1: Sub-models
Pull out any model inside your system for predictions.
# ----------------------------------
# to use as embedding extractor
# ----------------------------------
autoencoder = LitAutoEncoder.load_from_checkpoint("path/to/checkpoint_file.ckpt")
encoder_model = autoencoder.encoder
encoder_model.eval()

# ----------------------------------
# to use as image generator
# ----------------------------------
decoder_model = autoencoder.decoder
decoder_model.eval()
Option 2: Forward
You can also add a forward method to do predictions however you want.
# ----------------------------------
# using the AE to extract embeddings
# ----------------------------------
class LitAutoEncoder(LightningModule):
    def __init__(self):
        super().__init__()
        self.encoder = nn.Sequential(nn.Linear(28 * 28, 64))

    def forward(self, x):
        embedding = self.encoder(x)
        return embedding


autoencoder = LitAutoEncoder()
embedding = autoencoder(torch.rand(1, 28 * 28))
# -------------------------------
# using the AE to generate images
# -------------------------------
class LitAutoEncoder(LightningModule):
    def __init__(self):
        super().__init__()
        self.decoder = nn.Sequential(nn.Linear(64, 28 * 28))

    def forward(self):
        z = torch.rand(1, 64)
        image = self.decoder(z)
        image = image.view(1, 1, 28, 28)
        return image


autoencoder = LitAutoEncoder()
image_sample = autoencoder()
Option 3: Production
For production systems, ONNX or TorchScript is much faster.
Make sure you have added a forward method or trace only the sub-models you need.
TorchScript using
to_torchscript()method.
autoencoder = LitAutoEncoder()
autoencoder.to_torchscript(file_path="model.pt")
Onnx using
to_onnx()method.
autoencoder = LitAutoEncoder()
input_sample = torch.randn((1, 28 * 28))
autoencoder.to_onnx(file_path="model.onnx", input_sample=input_sample, export_params=True)
Using Accelerators
It’s easy to use CPUs, GPUs, TPUs or IPUs in Lightning. There’s no need to change your code; simply change the Trainer options.
CPU
# train on CPU
trainer = Trainer()

# train on 8 CPUs
trainer = Trainer(accelerator="cpu", devices=8)

# train on 1024 CPUs across 128 machines
trainer = pl.Trainer(accelerator="cpu", devices=8, num_nodes=128)
GPU
# train on 1 GPU
trainer = pl.Trainer(accelerator="gpu", devices=1)

# train on multiple GPUs across nodes (32 GPUs here)
trainer = pl.Trainer(accelerator="gpu", devices=4, num_nodes=8)

# train on gpu 1, 3, 5 (3 GPUs total)
trainer = pl.Trainer(accelerator="gpu", devices=[1, 3, 5])

# Multi GPU with mixed precision
trainer = pl.Trainer(accelerator="gpu", devices=2, precision=16)
TPU
# Train on 8 TPU cores
trainer = pl.Trainer(accelerator="tpu", devices=8)

# Train on single TPU core
trainer = pl.Trainer(accelerator="tpu", devices=1)

# Train on 7th TPU core
trainer = pl.Trainer(accelerator="tpu", devices=[7])

# without changing a SINGLE line of your code, you can
# train on TPUs using 16-bit precision
# using only half the training data and checking validation every quarter of a training epoch
trainer = pl.Trainer(accelerator="tpu", devices=8, precision=16, limit_train_batches=0.5, val_check_interval=0.25)
IPU
# Train on IPUs
trainer = pl.Trainer(accelerator="ipu", devices=8)
Checkpointing
Lightning automatically saves your model. Once you’ve trained, you can load the checkpoints as follows:
model = LitModel.load_from_checkpoint(path_to_saved_checkpoint)
The above checkpoint contains all the arguments needed to init the model and set the state dict. If you prefer to do it manually, here’s the equivalent
# load the ckpt
ckpt = torch.load("path/to/checkpoint.ckpt")

# equivalent to the above
model = LitModel()
model.load_state_dict(ckpt["state_dict"])
Learn more inside Checkpoint docs.
Data Flow
Each loop (training, validation, test, predict) has three hooks you can implement:
x_step
x_step_end (optional)
x_epoch_end (optional)
To illustrate how data flows, we’ll use the training loop (i.e., x=training)
outs = []
for batch in data:
    out = training_step(batch)
    out = training_step_end(out)
    outs.append(out)
training_epoch_end(outs)
The equivalent in Lightning is:
def training_step(self, batch, batch_idx):
    prediction = ...
    return prediction


def training_epoch_end(self, outs):
    for out in outs:
        ...
In the event you use DP or DDP2 distributed modes (i.e., split a batch across devices), check out Training with DataParallel section here. The validation, test and prediction loops have the same structure.
Optional Extensions
Check out the following optional extensions that can make your ML Pipelines more robust:
Debugging
Lightning has many tools for debugging. Here is an example of just a few of them:
Limit Batches
# use only 10 train batches and three val batches per epoch
trainer = Trainer(limit_train_batches=10, limit_val_batches=3)
# use 20% of total train batches and 10% of total val batches per epoch
trainer = Trainer(limit_train_batches=0.2, limit_val_batches=0.1)
Overfit Batches
# Automatically overfit the same batches to your model for a sanity test
# use only 10 train batches
trainer = Trainer(overfit_batches=10)
# use only 20% of total train batches
trainer = Trainer(overfit_batches=0.2)
Fast Dev Run
# unit test all the code - hits every line of your code once to see if you have bugs,
# instead of waiting hours to crash somewhere
trainer = Trainer(fast_dev_run=True)

# unit test all the code - hits every line of your code with four batches
trainer = Trainer(fast_dev_run=4)
Val Check Interval
# run validation every 25% of a training epoch
trainer = Trainer(val_check_interval=0.25)
# Profile your code to find speed/memory bottlenecks
Trainer(profiler="simple")
Other Cool Features
Once you define and train your first Lightning model, you might want to try other cool features like:
Read our Guide to learn more with a step-by-step walk-through!
Starter Templates
Before installing anything, use the following templates to try it out live:
Use case |
Description |
link |
|---|---|---|
Scratch model |
To prototype quickly / debug with random data |
|
Scratch model with manual optimization |
To prototype quickly / debug with random data |
Grid AI
Grid AI is our native solution for large scale training and tuning on the cloud.
Get started for free with your GitHub or Google Account here.
Community
Our community of core maintainers and thousands of expert researchers is active on our Slack and GitHub Discussions. Drop by to hang out, ask Lightning questions or even discuss research!
Masterclass
We also offer a Masterclass to teach you the advanced uses of Lightning.